DTF transfers have transformed garment decoration, delivering vibrant color, a soft, supple hand feel, and exceptionally durable adhesion across a wide range of fabrics, making prints feel as comfortable as they look. Understanding the Direct-to-Film process and the best DTF supplies helps designers achieve pro-level results efficiently, with consistent color, edge definition, and scalable production workflows. In practice, dialing DTF heat press settings and mastering DTF printing techniques are essential to reproduce sharp images consistently, minimize misprints, and maintain color fidelity on both light and dark garments. With quality films, bonding powders, and precise, repeatable workflows, you can scale from concept to customer-ready transfers while controlling cost, waste, and production timelines. This guide equips you with practical steps to optimize color fidelity and edge clarity across fabrics, while offering tested tips for setup, testing, and ongoing quality control.
Seen through the lens of modern fabric decoration, this approach is often described as a film-to-fabric transfer workflow, a film-based printing pipeline, or a lightweight textile transfer method. Practically, the technique relies on printing onto a translucent sheet, applying a bonding layer, and using a heat press to embed the image into textile fibers. As a concept, the Direct-to-Film workflow emphasizes ink chemistry, film quality, and precise cure cycles to maximize durability on diverse fabrics, from cotton tees to blends. When shoppers search for reliable supplies or reliable implementation tips, terms like DTF technology, coating powders, and transfer setting guidelines help connect the dots. This paragraph continues to set the stage for practical tips, troubleshooting, and optimization that follow in the guide.
DTF Transfers: Mastering the Direct-to-Film Process for Pro-Quality Garments
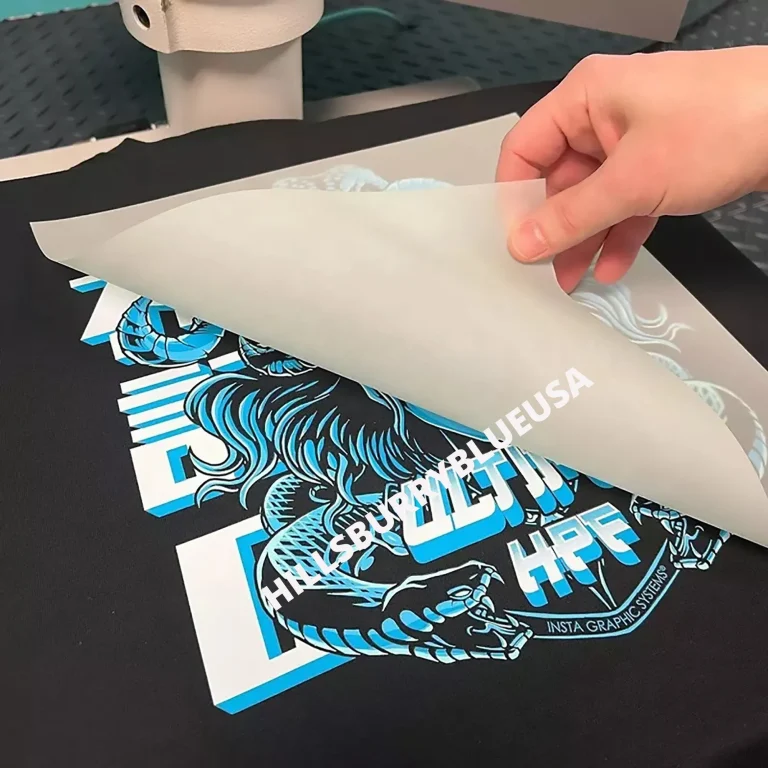
DTF transfers have revolutionized garment decoration by delivering vibrant color, smooth hand, and durable adhesion. In the Direct-to-Film process, you print your design onto a translucent film, apply bonding powder, cure, and then transfer the image to fabric with a calibrated heat press. This pathway supports a wide range of textiles—from cotton to polyester blends and even dark fabrics—and is prized by designers seeking fast turnaround and professional results.
To consistently achieve pro-level results, focus on the right tools and settings: choose Best DTF supplies, manage ink density for sharp edges and rich color, and fine-tune your DTF heat press settings. When you align high-quality materials with careful workflow—from design prep to transfer—the output exhibits crisp detail, even gradients, and durable adhesion that stands up to washing and wear.
DTF Printing Techniques and Best Practices for Color Fidelity and Durability
DTF printing techniques hinge on precise color management, film quality, and proper curing. Raster and vector preparation, ICC profiling, and thoughtful dithering help preserve detail and reduce color shifts across fabrics. Selecting the right DTF inks and DTF films, along with an appropriate bonding powder, ensures edge definition, satiny texture, and reliable transfer across light and dark substrates.
Best practices focus on repeatability and optimization: calibrate ink density to avoid oversaturation, test color management on representative fabrics, and document your heat transfer protocol. Layering with a white underbase for dark fabrics, controlling powder application, and tuning your heat press temperature and dwell time are essential steps for consistent, durable results that rival traditional methods.
Frequently Asked Questions
What are the critical steps in the Direct-to-Film process to ensure durable, vibrant DTF transfers, and how should I tune my DTF heat press settings?
Key steps in the Direct-to-Film process include design preparation, printing with compatible DTF inks on the transfer film, applying a bonding powder, curing the powder, and transferring the image to fabric with a calibrated heat press. For reliable DTF transfers, tune the heat press using typical ranges: 315–325°F (157–163°C) for light fabrics and 320–330°F (160–166°C) for dark fabrics, dwell 15–20 seconds, apply firm, even pressure, and follow the hot-peel or cold-peel method recommended by your film/ink. After transfer, allow the garment to cool and wait 24 hours before washing to maximize adhesion.
Which Best DTF supplies and practical DTF printing techniques should I prioritize to achieve pro-level transfers?
Prioritize Best DTF supplies such as DTF inks compatible with your printer, high-quality DTF films, premium bonding powders, reliable curing equipment, and useful transfer accessories (non-stick sheets, silicone mats, heat-resistant tapes). Pair these with solid DTF printing techniques: strict color management using ICC profiles and test swatches, white underbase layering on dark fabrics for vibrancy, high-resolution design prep with appropriate dithering, attention to edge integrity, and careful control of ink density and curing to improve hand-feel and wash durability.
| Topic | Key Points |
|---|---|
| Introduction |
|
| Understanding DTF transfers |
|
| Direct-to-Film process explained |
|
| DTF printing techniques and best practices |
|
| Essential DTF supplies |
|
| Pro-level techniques for color accuracy and detail |
|
| DTF heat press settings |
|
| Troubleshooting and optimization |
|
| Case studies and tips |
|
| Finishing touches and care instructions |
|
| Conclusion |
|
Summary
DTF transfers empower designers and printers to achieve vibrant color, sharp detail, and durable adhesion across a range of fabrics. By embracing the Direct-to-Film workflow, selecting top-tier DTF supplies, and refining heat press settings, you can consistently produce professional results. An iterative approach – test, document, and optimize – helps you scale from small runs to larger batches while maintaining color accuracy and hand-feel.