California DTF invites makers and entrepreneurs to explore a practical entry point into modern garment customization. If you’re curious about starting a project and want a simple roadmap, you’re in the right place. This beginner-friendly guide outlines what California DTF means, why it’s popular for small businesses and hobbyists, and how to move from curiosity to cost-conscious production. From choosing the right DTF equipment to optimizing your workflow, you’ll learn how to set up a workspace that minimizes mess for local creators. With practical insights on gear and launching small runs, this overview keeps the process approachable for beginners everywhere.
In other terms, the same concept is understood as a film-to-fabric transfer workflow, a lightweight alternative to traditional screen or vinyl methods. Designs are printed onto a transparent transfer film using CMYK inks, including white where needed, and then heat-pressed onto garments to create vibrant, durable results. Industry observers describe this as a direct-transfer-on-film technology that supports small runs and customization without large screens or dyes. For beginners exploring apparel printing, the emphasis is on color management, workflow efficiency, and choosing appropriate film, inks, and a reliable heat press. As you gain comfort with this film-based transfer approach, you’ll see how the same principles apply across a growing range of textile projects.
Getting Started with DTF Printing for Beginners: A Practical Roadmap
DTF printing for beginners is a practical entry point for people who want to customize garments without a steep learning curve. Direct-to-Film printing uses a printer to apply CMYK inks (with white ink when needed) onto a transfer film, which is then heat-transferred to fabric. This approach delivers vibrant color and durable transfers, making it appealing for hobbyists and small shops alike.
Set a simple starting goal and map out the essential DTF equipment and DTF supplies you’ll need. Create a clean, well-lit workspace and outline a basic budget so you can progress from curiosity to your first finished transfers with confidence.
Direct-to-Film Printing Demystified: How DTF Works Across Fabrics
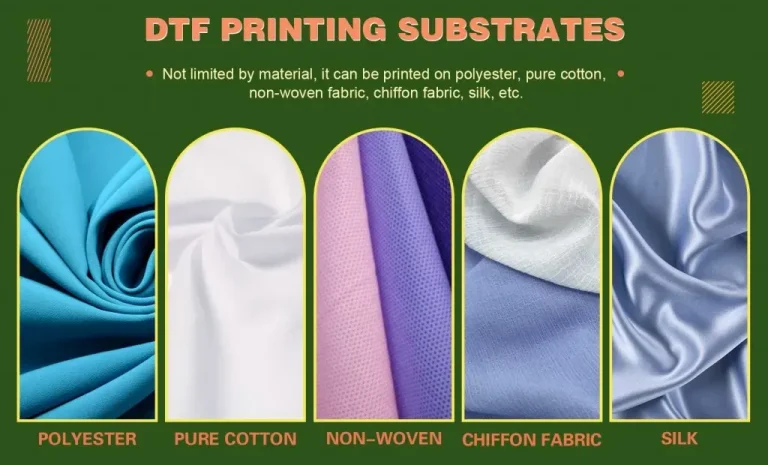
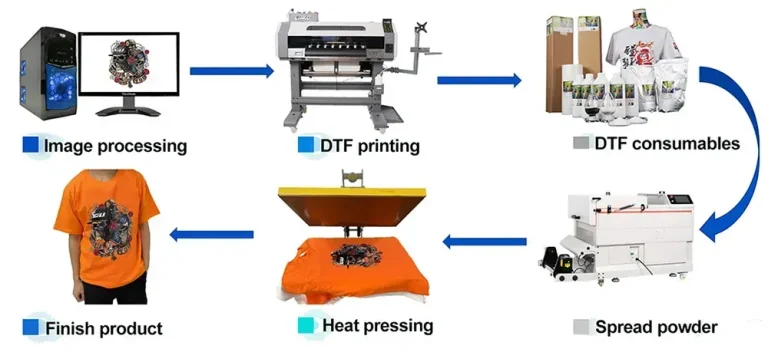
Direct-to-Film printing, or DTF printing, begins with printing the design onto the transfer film using CMYK inks and white ink for opacity on dark fabrics. The printed film is then coated with adhesive powder, cured, and finally pressed onto the garment. The result is a flexible transfer that adheres to cotton, polyester, blends, and more.
Understanding how different fabrics respond to heat and adhesion helps you choose the right powders, curing times, and film for each project. With the right DTF supplies, you can achieve consistent color and opacity across runs.
Choosing the Right DTF Equipment for Your Studio
The heart of your setup is a printer capable of CMYK inks plus white, paired with DTF film compatible with your ink system. When selecting DTF equipment, look for reliable feed, good color management, and accessible support—ideally from local California suppliers who can offer demos or in-person guidance.
Plan for space, ventilation, and power. A compact, dedicated workspace helps you keep prints, powders, and clothes organized, reducing cross-contamination and speeding up your workflow. This is where DTF printing equipment meets practical studio ergonomics.
Essential DTF Supplies: From Film to Finished Transfers
DTF supplies form the backbone of every transfer: transfer film designed for your printer, white ink (if required), CMYK inks, powder adhesive, a curing method, and a heat press. Each component plays a specific role in getting a vibrant, durable image onto fabric.
Stock up on silicone sheets, tweezers, PPE, and a small stash of test garments in common fabrics. Keeping a regular inventory of DTF supplies helps you maintain consistency as you scale.
DTF Workflow Optimization: From Design to Final Transfer
A smooth DTF workflow moves from design prep to printing on film, powdering, curing, and transferring. Focus on color management, proper RIP software settings, and consistent powder thickness to reproduce reliable results across fabrics.
Document your process by logging temperatures, timings, and outcomes for each garment type. This internal playbook makes it easier to reproduce successful transfers as you grow your DTF printing practice.
California DTF: Building a Local Practice and Small Business
California DTF connects you with a growing community of makers, suppliers, and technicians. Local networks provide tips, troubleshoot issues quickly, and share successful workflows, which can accelerate your learning curve.
With a clear plan, you can transform curiosity into a scalable side business—offering custom tees, hoodies, and accessories to California customers while leveraging regional resources and events in DTF printing for beginners and seasoned crafters alike.
Frequently Asked Questions
What is California DTF and how does Direct-to-Film printing work?
California DTF refers to the growing Direct-to-Film printing approach used by makers and small businesses in California. Direct-to-Film printing (DTF) involves printing designs onto a transfer film with CMYK inks (plus white for lighter fabrics), applying an adhesive powder, curing the film, and then transferring the image to fabric with heat. It works on a wide range of fabrics and is popular for beginners due to lower setup and versatile results.
What DTF equipment do I need for beginners in California DTF?
Essential DTF equipment for California DTF beginners includes a printer capable of CMYK plus white (or a white-ink model), DTF film, white ink if required, CMYK inks, adhesive powder, a curing method, and a heat press. A clean, ventilated workspace and basic PPE help safety and quality. Consider refurbished entry-level printers if you’re testing the process before scaling.
How does DTF printing compare to other methods for California makers?
DTF printing offers vibrant colors and durability on cotton, blends, and dark fabrics, with less setup than screen printing—making it a practical choice for California makers doing small runs. Direct-to-Film printing provides sharp results across diverse fabrics, offering flexibility that many hobbyists and small businesses in California value.
What DTF supplies are essential for California DTF printing for beginners?
DTF supplies include transfer film, white ink (if your printer uses it), CMYK inks, adhesive powder, a curing method, a heat press, silicone sheets, and a well-organized workspace. Having these on hand supports a smooth beginner workflow for California DTF projects.
How should I set up a safe and efficient California DTF workspace?
Create a clean, well-ventilated, dedicated California DTF workspace with separate zones for printing, powdering, and pressing. Keep powders, inks, and films organized to prevent cross-contamination, and use protective PPE and silicone sheets to ensure consistent transfers and equipment longevity.
What are common mistakes to avoid with California DTF printing for beginners?
Common mistakes include skipping color management, under-curing leading to poor adhesion, incorrect film loading, overloading the heat press, not testing across fabrics, and failing to log settings for reproducibility. Avoid these to improve consistency in your California DTF projects.
| Topic | Key Points |
|---|---|
| What is DTF printing? | DTF stands for Direct-to-Film printing. It applies a design to a transfer film, which is heat-pressed onto fabric. Supports many fabrics, yields vibrant colors. Uses CMYK inks plus white ink for opacity on light/dark fabrics, with adhesive powder, curing, and final transfer. |
| DTF vs other methods | Compared to screen printing, heat transfer vinyl, and sublimation, DTF is cost-effective for small-batch work and requires less setup. It can print sharp images on cotton, polyester, blends, and dark fabrics—great for California creators with lower upfront investment. |
| Roadmap to starting printing | A practical, beginner-friendly path: learn basics and set goals; evaluate space; choose printer and supplies; gather essentials; learn the core workflow; test and document; start small and scale; build a brand story and customer flow. |
| Equipment and supplies | Starter kit includes: CMYK printer with white ink option, DTF film, white ink (if needed), CMYK inks, powder adhesive, curing method, heat press, silicone sheets, ventilation, PPE, organized workspace, basic tools, and garments for testing. |
| Choosing the right printer and film | Consider print quality and color management, white ink handling, reliability and local service, and cost per print. Local California suppliers and support can be valuable. RIP software can help with color accuracy. |
| Quality control & troubleshooting | Calibrate with test prints, ensure correct film loading, monitor powder adhesion, cure properly, keep a clean workspace, and log settings for each garment type. |
| Workflows for beginners | Design prep, printing on film, powdering and curing, transferring, finishing. Use consistent media sizes and maintain alignment for repeatability. |
| Common beginner mistakes | Skipping color management, under-curing, overcrowding the heat press, not testing across fabrics, and failing to log settings. |
| Practical motivation tips | Start small, celebrate milestones, join local or online communities, invest in training or demos, and keep the workspace organized to speed production. |
| Quick glossary | – DTF: Direct-to-Film printing. – California DTF: regional community/resources in CA. – White ink: opacity on dark fabrics. – CMYK: color process. – Transfer film: film for the printed design. – Powder adhesive: helps transfer adhesion. |
| Conclusion | This table summarizes the key points of the California DTF introduction and beginner guide. The journey emphasizes accessible gear, practical workflows, and ongoing learning to build a scalable DTF practice in California. |
Summary
Conclusion: your California DTF starter path can be simple and rewarding. Starting with California DTF doesn’t have to be overwhelming. By focusing on a clear, beginner-friendly roadmap—from understanding the basics to selecting the right equipment and supplies, setting up a functional workspace, and following a straightforward workflow—you can build confidence and see tangible results quickly. The essential ingredients are reliable gear, quality DTF supplies, careful testing, and a willingness to adjust your approach as you learn. As you gain experience, you’ll refine your techniques, expand your product line, and turn your DTF printing hobby or side business into a scalable venture. With patience and practice, your California DTF journey can become a steady source of creativity and opportunity for you and your brand.